 |
| Construction of Utility bike |
With a 17.53 to 1 gear reduction ratio [that is 6:1 for the planetary gears multiplied by the 2.92:1 external gear reduction ratio] I should be able to climb even the steepest hills in town with 450lbs total combined weight. But I must weight untill I get a CycleAnalyst watt meter to really test out the hill climbing capabilities of this machine.
A
single speed drive is stronger than a multi speed drive with cassette.
And this is motor could destroy the freehub body if I don't
accelerate slowly. So I may need to buy a single speed hub that can
hold a single large sprocket on the right side. It already has a
tendency to jerk when the chain engages the already moving freehub
body.
That
is why I may need to get a better controller. One that can produce
three separate speeds at the flip of a switch.
 |
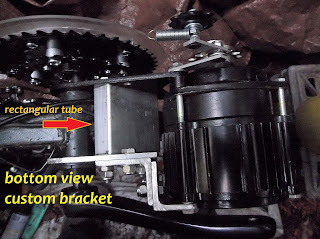
| starting custom mounting bracket |
 | |
|
 |
| fitting the custom mounting bracket |
 |
| bottom view |
 |
| left side |
idler arm modification
I
had the idler wheel grinding against the motor sprockets the first
time.
And
he first arms (that came with the kit) were too narrow [12mm], the
counter sink holes weakened the bars; they ended up bending.
So
I took it apart and put it back together several times untill I got
it right. I finally had to build stronger idler arms [3/16th
inch (approx. 5mm) 6061 aluminum alloy 15mm wide] to keep them from
bending again (I hope).
But
then the fit was still not right. The bolt head under the first
thicker aluminum arm was too thick and I could not find a stainless
steel bolt [6mm x 1p x 65mm long] that could be counter sunk. So I
used the black steel flathead bolt that came with the motor after I
sprayed it with acrylic and filled the threads with grease. I also
think it would be best not to drill a counter sink hole all the way
into the aluminum motor mounting bracket.
The
shorter second arm should not be thicker than 1/8th
[3mm] to hold the idler wheel in exactly the right place.
I
think it would be much better to make them out of hard steel [3mm
thick but 15mm wide]. But making them at home maybe impossible to
counter sink the two holes that need it. But I don't want to pay for
a machine shop.
Drilling
a new hole to the left side made every thing fit better. Only one
spacer was needed [about 3mm]. If I ever find stainless steel spacers
I will buy an assorted box of them.
With
all this extra work I don't think I saved any money from not buying
the Bafang 1000w mid-drive kit. But does it have room for two
front chainrings?
 |
| this is the right kind to use |
I thought I had enough electrons for three trips to town. But after riding to town and running out of power on the trip home. I figured that I must have been getting really bad mileage with my low gear on the front crank. So I had to replace my MTB's large chainring to get better mileage on the downhill trip going into town. Not steep enough to freewheel. And my knees are so bad I need to use the motor.
I may need to charge my battery pack while intown, if I am going to have to haul a large load home. It was difficult to figure-out how to connect all three of these chainrings together.
 |
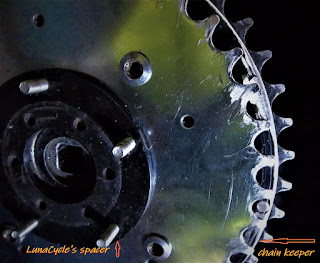
| The derailment guards keep the chain on the sprockets |
The space between the outer chainwheel [motor sprocket driven] and the middle does not need a spacer if using luna's heavy duty “chain wheels” because the heavy duty 40t chainring will not flex like the computer engineered chainrings will.
I think I could use regular chainring bolts if I could get them 16mm long, then the 5mm bolts would not be needed. But the chainring bolts interfere with the chain on the 32t chainwheel.
The image on luna's website showing a triple crank, shows the round heads on the wrong side. The lock-nuts will not fit under the crank arm. But they do-not rub against anything on the bike side.
These “chainwheels” don't shift as easy as the computer engineered kind but they will last much longer. So I slow down and shift before I start climbing our 16% grade hills drawing about 1400watts from the battery pack.
battery box:
 |
| european cabinate henges |
My new 8 speed cassette with 42t sprocket [wow what a hill climber, I was using 32t for the lowest gear in the rear]. My cheap derailleur shifted up with no problem at all. It also has a 36t for the second gear. Now I don't need to shift down my front gears. And I can pedal my heavy cycle truck without the motor if I need to.
 |
| 8 speed 11-42 with 36 for the second gear |
 |
| http://sickbikeparts.com/front-freewheel-heavy-duty/ |
Warning!
Do Not use a whimpy Bicycle frame rear end like I did. The motor can pull the rear end over and you will have to have the frame straightened like I did. It is much more sensible to build a rear end out of rectangular tubing. Even if you must have it welded rigid to use a mid-drive kit with.
I am now going to have to build a bolt on rear end out of stainless steel rectangular tubes. Like work hardening 304 or 316 stainless steel. No painting needed.
The whole story
the motor
https://commutercycling.blogspot.com/2018/03/welldarn-my-sox-at-long-long-last-found.html
exploring gear possibilities
https://endless-sphere.com/forums/viewtopic.php?f=1&t=94449


No comments:
Post a Comment